Monday, January 26, 2009

Key ring inspiration

Hi Guzzisue, and everyone


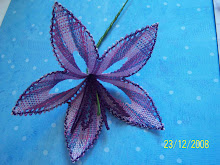
Yes we threaded the passives through the small ring attached to the keyring by passing the centre loop up through the ring and then threading the bobbins through the loop. The workers started on the first pin, so that they don't pull oddly. You can work the leaf in any stitches you please...I used a smaller size to decorate my Christmas baubles...then gave them to friends as gifts. I put 4 leaves on each ring and worked opposing leaves the same...1 set in half stitch and the other in cloth, cloth and twist. You could also use 3 leaves all the same or all different...so many possibilities :) Once the leaves are complete, bundle the whole lot together under the bauble, wrap a few times with a pair of workers and tie off. Just measure the circumference on your bauble, divide in half then make a leaf shape to suit! Enlage to a suitable size on the photocopier to make the keyring.

A word of warning though...for the Christmas baubles, make sure your metal ring fits snugly under the hanging attachment so that you can replace the hanger to complete your bauble. Also, be very careful of the join in the ring...it will snag the thread very easily or slip off the loops if you do not take care.

Saturday, January 24, 2009

1st Lace Day of the year

I would like to send a warm welcome to all the visitors to this blog...I hope you are finding something of interest here.


A Lace Day with some work done!! Yes it does happen occasionally. 10 year old Ebonee started and completed her project number 4... a keyring leaf made in perle 8 cotton thread using cloth and twist and cloth stitches. She completed this project with very little input from me at her first visit to my lace meetings. She is eager to go back again and almost ready to start on her next project...a half stitch flower that one of our juniors was making today.

And I also made some progress! I was very keen to have a go at needle lace before Christmas and participated in a workshop held by a couple of our members. At the next meeting, I proudly showed my flower, only to be told it was not complete :( Not to be put off in any way, I tried again...with full instructions on how to finish off my flower. I have made several attempts, but have not been happy with the result of the final cover stitches. I have to admit that I was almost ready to give up and stick to bobbin lace and tatting. I know there is much practice required, but these are the first time:) I think I might try a butterfly next! And finer thread. And some bobbin lace too. Here is the final lead up lesson for my school students. This bookmark features spiders, trails and ground. Now all I have to do is the lesson notes! One of the juniors in our lace group wishes to have a go at the fan when the notes are complete. She will soon let me know if she thinks something is not right.

Wednesday, January 21, 2009

Bobbins

I was asked this morning about the bobbins that I have made, so here goes. I have heard it said that need breeds invention...well the need to learn to make lace, and therefore the need to increase my bobbin selection was a raging fire that was not satisfied with access to beginner bobbins once a month:) A friend of DB(eloved) owns a lathe, and having a heap of Huon Pine offcuts, I had the timber. My last experience on a lathe was 25 years ago...I made a sugar bowl that was supposed to be a goblet, but never let a little thing like lack of experience stand in the way! DB's mate left the workshop so he did not have to sort out severed fingers and I whittled away...by the end of the afternoon, I had broken 3 hardwood attemps (2 oh so close) and joy of joys - was the proud owner of a fine Huon Pine bobbin! (Not a cut finger in sight!) DB built me a lathe for my birthday :D The first 5 above are all Huon Pine, the 2 outside ones being travellers - well the end broke off, but they are still great to use, right? The next 2 are believed to be Myrtle - scrap timber that fell my way. The next is made from a piece of Cedar...it's life is interesting...tree to church pew, then a scout hall feature, next part prop for hovercraft and this small piece of leftover was made into a bobbin, affectionately known as "the cricket bat's mate". The 4 on the right really were born of desperation! They are 8mm wooden beads, threaded onto skewers...I needed 60 odd bobbins in less than a week at school and these are the result. The kids love them. I have also used some Blackwood, Silky Oak and Tas Oak hardwood. I love working with the Mytle and Silky Oak, and the smell of the Houn Pine is wonderful.
This pic shows the bobbins I made for a birthday gift. All the painted bobbins are made of Tas Oak and depict favorite things of the recipient...pets, occassions, flowers, etc. The wooden look bobbins are Huon Pine, each pair representing a family member or special occassion...birthdays, wedding etc. Each of these has been spangled with beads that represent the person marked on the bobbin...favorite colours and that sort of thing.
I do still collect the odd bobbin made by 'real bobbin makers', but I am somewhat proud of my little collection and continue to slowly add to them. Not counting the 16 pair on this pillow, I have about 40 pair that I have made I think.

Sunday, January 18, 2009

Bobbin winders and fish tails


With a broken shaft, balance out the window and unwanted holes in the skirt, yesterday proved to be rather sad for our hovercraft :( The mood last night was somewhat sombre to say the least!
I was able to take my frustration out on my tatted doily, completing 1 and a half motifes for the final round. Progress is slow but it is progress :)

I also spent my lace time in the morning rewinding bobbins for my next lesson, so I thought I would show you my handmade bobbin winder mark II. The nylon shaft, driven by a posties rubber band provides a 2 for 1 return, so bobbins wind rather quickly. Simply sit the bobbin under the rubber band and in the grove, attach the thread and wind away...quiet, quick and efficient! Next time I fire up the lathe, I intend to make a wooden handle to put in the shaft, as the aluminium makes my fingers dirty...I am sure I will have no problems breaking a bobbin or two for the job!
And here is the next lesson...introducing a fish tail fan and using the cloth stitch to make a trail...and we now have 3 elements together :) I am still using up the left over thread from the fan (the goal of the tuition sessions), but thought this one would look great with a pale green worker pair in the trail...would look a bit like flowers, don't you think...
Again, I made up the design in Lace R-XP, and in the working, I have filled out the trail with an extra pair of passives, given that the same element in the fan looked a bit sparse.
One question that is really starting to bug me...How on earth do you know if someone else has already come up with this design??? It is so simple, surely it must be 'out there'.
The good news for the hovercraft is that a new shaft (in stronger materials) can be made by tomorrow night, the holes in the skirt have been fixed neatly and the balance is not so bad as we first thought...at working puff, the skirt is full and the deck is balanced after all :) Now we just have to make the issue that broke the shaft go away...that may involve a bit of work as we have (sort of) differing opinions and should sort out both at once to save having to purchase yet another shaft!


Friday, January 16, 2009

Today's 6 pins :)

A busy morning, doing some of that dreaded h********k stuff...not too much mind :), then a little paint splashed onto the hovercraft...the upside being I will be lucky to be allowed to splash some on the house any time soon :D, then joy of joys - my 6 pins (and then some).

Lace is a passion I wear on my sleeve (well around my neck as collars and in my ears as earrings really). My job as a relief teacher enables me to 'play' with many children, and occassionally I even get invited back...such has happened at a school in the north of our beautiful state. The students know of my lace making (I have been invited back often for a little over a year) and when I recently spent 4 weeks on the same class, the request was "Can we make some lace please Miss?"

36 children experienced what a joy lace is to make :)

Now I find myself planning lessons to teach some more...well for some of the older students anyhow. This bookmark has (known) cloth stitch diamonds with introduced ground, and puts the 2 elements together...the first step toward the fan on my first post!

There are several great teaching books out there, and I do not aim to replace them, but my audience are 7 to 14 year old students who have taken to lace with (almost) as much passion as I have :) My goal was to provide an experience in which they would encounter some success...I believe I have acheived this beyond my wildest imagination!


Thursday, January 15, 2009

The first post.

Please bear with me...this is the first time :)

I started tatting in June 2006. While many of my projects have been quite small, I am almost finished my third doily. This is No 2...as entered in the Royal Launceston Show in 2007. Although only a small regional show with few lace entries, I am very proud of the blue ribbon decoration :)


I have been making bobbin lace since October 2006 and I love it. Whilst I have tried Torchon and Bedfordshire lace, there are many more I would like to have a go at in the future. My present focii are a Bedfordshire ring designed by Barbara Underwood, and the development of some of my own Torchon designs. In the (near) future I am looking to try out Buckinghamshire lace for the first time, but until then...


My Torchon flowers, designed by Rosemary Sheperd and found in the book Fantasy Flowers by Rosemary Sheperd...a Christmas gift made in December 2008...


And my own designs, a fan and a length...my first foray into Lace R-XP, a design program for lacemakers.


There are many fabulous Lacemakers out there, and my humble offerings are the beginning of my lacey story. You are welcome to stay tuned and watch my progress.