Welcome All,
The rain is beating on the tin roof (somewhat more gentle than yesterday morning's storm)...a very welcome sound, (even though I have bucket loads of washing to do :()
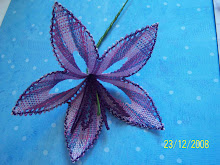
Here are a couple more Quanti snowflakes. I have chosen to make 25 of these in one year...actually I would need to aim for more like 40 for my Christmas cards this year, but we will see! I thought the gold on the left on was Butterfly metallic, but I now don't think it is. The blue in the centre is Candlelight metallic and the white is Coats crotchet cotton No 20. The other is Perle 8, the verigated is by Anchor (shade 1344) and the solid colour one is a DMC (shade 211). I have not blocked either - thought I would wait for a few more - so they look a bit off. They will be stored until close to Christmas, and it is important they look great then so I will take more pics of groups of snowflakes - blocked and ready to find new homes :) In the meantime, these count as 5 and 6 towards my challenge.

Just before Easter, Diane (Lace Lovin' Librarian) suggested a thread swap ... you know, foster world wide friendship through lace and blogging. As my access to nice threads is limited to mail order much of the time (we do have a great local shop who will source lots, but the time involved is 3 projects long at times) I decided to send her some tools for her new adventure in bobbin lace in exchange for the threads. This was mutually very pleasing! Here is the first 3 rounds of a doily using the gorgeous Lisbeth No 20 thread in shade 632. Those of you lucky enough to be familiar with this thread will know the colour has not been done a justice in this pic!

My parcel also included Lisbeth shades 651 (a lovely pale blue) and 660 (a delicious olde world minty green), 3 reels of size 70/80 tatting thread (white, pale blue and verigated yellow) and a hank of Ladyshuttlemaker's hand dyed rain forest. 2 shuttles from Lacis (1 purple [in use for this little project] and a grassy green one) and the delightful book - Tatting by Myra Piper also tumbled out of this little treasure package. Now I really do need more hands!!
I have not forgotten the bobbin lace readers either! This morning I unpinned my Maltese Tape Lace A. This is the first time I have attempted this lace so although there are glaring mistakes, I am rather pleased with the result. The final leg has the Arches stitch, and although a pain to tension nicely I feel I would love to do some more. The basket weave has not shown up so well in the pic, but gives a neat texture to the straight leg and I simply love the ovals stitch in the cross bar.

I am off to join my Oliver Twists hankie...it has been 'resting' for over a week now so should be ready to remove from the pillow. Tomorrow I am going bushwalking with my Joey Scouts (if the rain stops) so that will test the Physio I have endured this week :) Saturday at lace we have a mainland visitor coming along so that should be fun too!
Enough waffle on my part, but your comments are always welcome here :) Until next time, take lots of care, make lots of lace and as always - have lots and lots of fun :)
 And it was a great week at school too. Here are the 2 bookmarks, completed by my senior students. They are delighted with the results of their hard work over the past few weeks and now looking forward to their next project. One of the juniors also finished his snake bookmark, but the pic I have includes the student and cannot be shared here.
  All of this means I have more bobbins to wind and the list of students will get shorter for all of 3 minutes, until word gets around that there was an empty pillow!

 These are her decorated beginner bobbins. The 3 pair on the left are painted, then coated with a clear varnish. The next pair are simply coated with the clear varnish. 2nd from the right have small, torn tissue pieces glued on with the varnish, then a final coat over the top when dry. The right hand pair have the same pink verigated thread as her work wound around the smooth part of the handle, then also finished with a coat of varnish. The pillow, cover cloth, bobbins and spangle beads were part of her birthday present last year.
 Here is the adjustable table DS made for me to make lace on. Well.... actually he made me a cross stitch stand, but when I began making lace, he made a new piece to put in the top so I could put my pillow on. When I want to cross stitch, I can take the table piece out, and put the old cross stitch frame holder back, using the 2 lengths that are folded down here. He even added some stenciled silver roses, coz he knows his mum loves them :) Isn't he a clever lad?!
 Ok, ok! Yes I have also done a little :) Here is the beginnings of my L.A.C.E. letter L. I am using the leftover Oliver Twist thread from my hankie (isn't it a gorgeous colour) and the pattern is my first ever attempt at design. It is an adaption of a Rosemary Shepherd design from her Introduction to Bobbin Lace book. I needed to widen the insertion, add corners and cut and shut to fit a bubble frame. I added a cross stitch of LOML's 3 children and presented it to their Nanna for her birthday a couple of years ago. This time, I will just make a long and short leg and....bingo - my L!


 Here is my A with the first leg completed. I used basket weave stitch for this leg.


 Here is the box without the roll. First I made the outside box in seperate sections, each consisting of cardbaord from a TV box covered with a pocket made from the outside fabric (a rubber backed curtain) and the inside fabric (printed cotton). I made the 2 dividers and covered them in the inside fabric. This was all stitched together. To make the flaps, I cut the form from the TV box and made the pocket from an inside piece and an outside piece of fabric. Before I inserted the card, I used a repositionable spray glue to attach some quilting batting to the inside. This gives a padded surface to work on. After enclosing the card, these were stitched to the box section. I made a pin cusion from a hankie to put in one small section and spare bobbins, thread, rollers and tie down ribbons reside in the other small section. The box measures 35 cm or 14" end to end and 4 1/2" or 11 1/2 cm deep. It is 3" or 8 cm high. The flaps are 14" x 10" or 25 cm.
 Rollers pined to the back flap keep the completed lace clean and out of the way. The ribbon on the front flap is used to secure the bobbins for travel. I thread it through the spangles and pin them close in, then fold the leftover ribbon across the bobbins and pin again. Not pretty, but it works well. Sometimes I put a piece of cloth against the completed lace to stop it being pulled by the pins in the pillow...not always necessary, it depends on the openess of the lace and the need to keep extra pins in.
 Here you can see the ribbon that is glued to the outside, forming a loop on one flap and loose ends on the other. The loose ends can be tied around the loop piece to secure for travel. Here you can see the second one I made in action
 These pillows are great for going to Lace Days - so why do I always seem to only have lace on my very large square or cookie pillows?? Lengths of lace are perfect because you just keep turning the roll. If your pattern does not join up perfectly, have 2 prickings and just pin the new one as the previous pricking runs out :)