Showing posts with label lace makers. Show all posts

Tuesday, July 29, 2014

Some bobbin lace PHD's

 First of all, here is the next lace for a porcelain doll...slow progress, but a little every now and then...have to find/design another piece to complete the doll, so still a long way to go before a doll will be seen.  This is Bucks Point in Finca 80...wide design by Heather Billington, narrow one from Pamela Notingham's Intro to Bucks book I think.
 Here is the 2nd piece from the workshop I was participating in when Colin collapsed.  I completed the 1st repeat at the workshop and most of the rest of this one was done at Colin's hospital bedside during his 2nd stay in Hobart.  The thread is Lizbeth 80...have no idea why I would buy this colour in the first place, but love it in this piece.  The designer is Ethel Zuccolotto.
My 3rd piece was started yesterday.  The pattern is from the Ulrike Voelcker Torchon series, done in Thai silk from a supplier here in Tassie.  The scarf will be for Colin's daughter...maybe for Christmas...
 
up close...
 
Finally, after our recent trip to visit Colin's surgeon, we decided to stay over and visit Mona Museum...I found out about this cement truck from a friend in Estonia on Facebook...now I have seen it for real!!
 
The detail is simply amazing, and it smells much better than one of the artist's other instalments at the museum!!

 Hugs to all, may your pins never bend and your threads never break, so that you can make the most of every moment life has to offer!


Saturday, November 6, 2010

A little bit of lace and...

I have now finished my Withof scroll that I started at Yvonne Scheele-Kirkhof's workshop in Melbourne several weekends ago :)
I have taken the picture of both pieces with an Australian dollar to show you the sizing...
maybe I also need to grab a measureing tape?
Let me know what you think...

Next I want to try one of the smaller pieces in her book...Dutch Bobbin Lace Patterns...
I have also been getting on with some quilting. This one is pieced onto card by hand and was introduced to you in this post.
When it is finished, I will be giving it to D.S.2 and his lady...there are 42 of each of 4 different squares. This is the first lot of boats with a single sail...stay posted to see the next batch of completed squares.
A change of pace now...
Every second Monday evening I go to a quilting/sewing/craft group. The ladies are very skilled at machine quilting, and as I can do the hand sewn ones at home, I have been trying my hand at the machine constructed variety.
My first attempt can be seen here...BTW the quilt measures 110 cm (43 inches) square.
Now it is time to get on with a new project?!?!?!???
My gorgeous little grandson turned 1 year old yesterday. Unfortunately I do not get to see him these days, but that does not mean I have forgotten him!
Although this will be very late, I am making him a quilt for his bed.
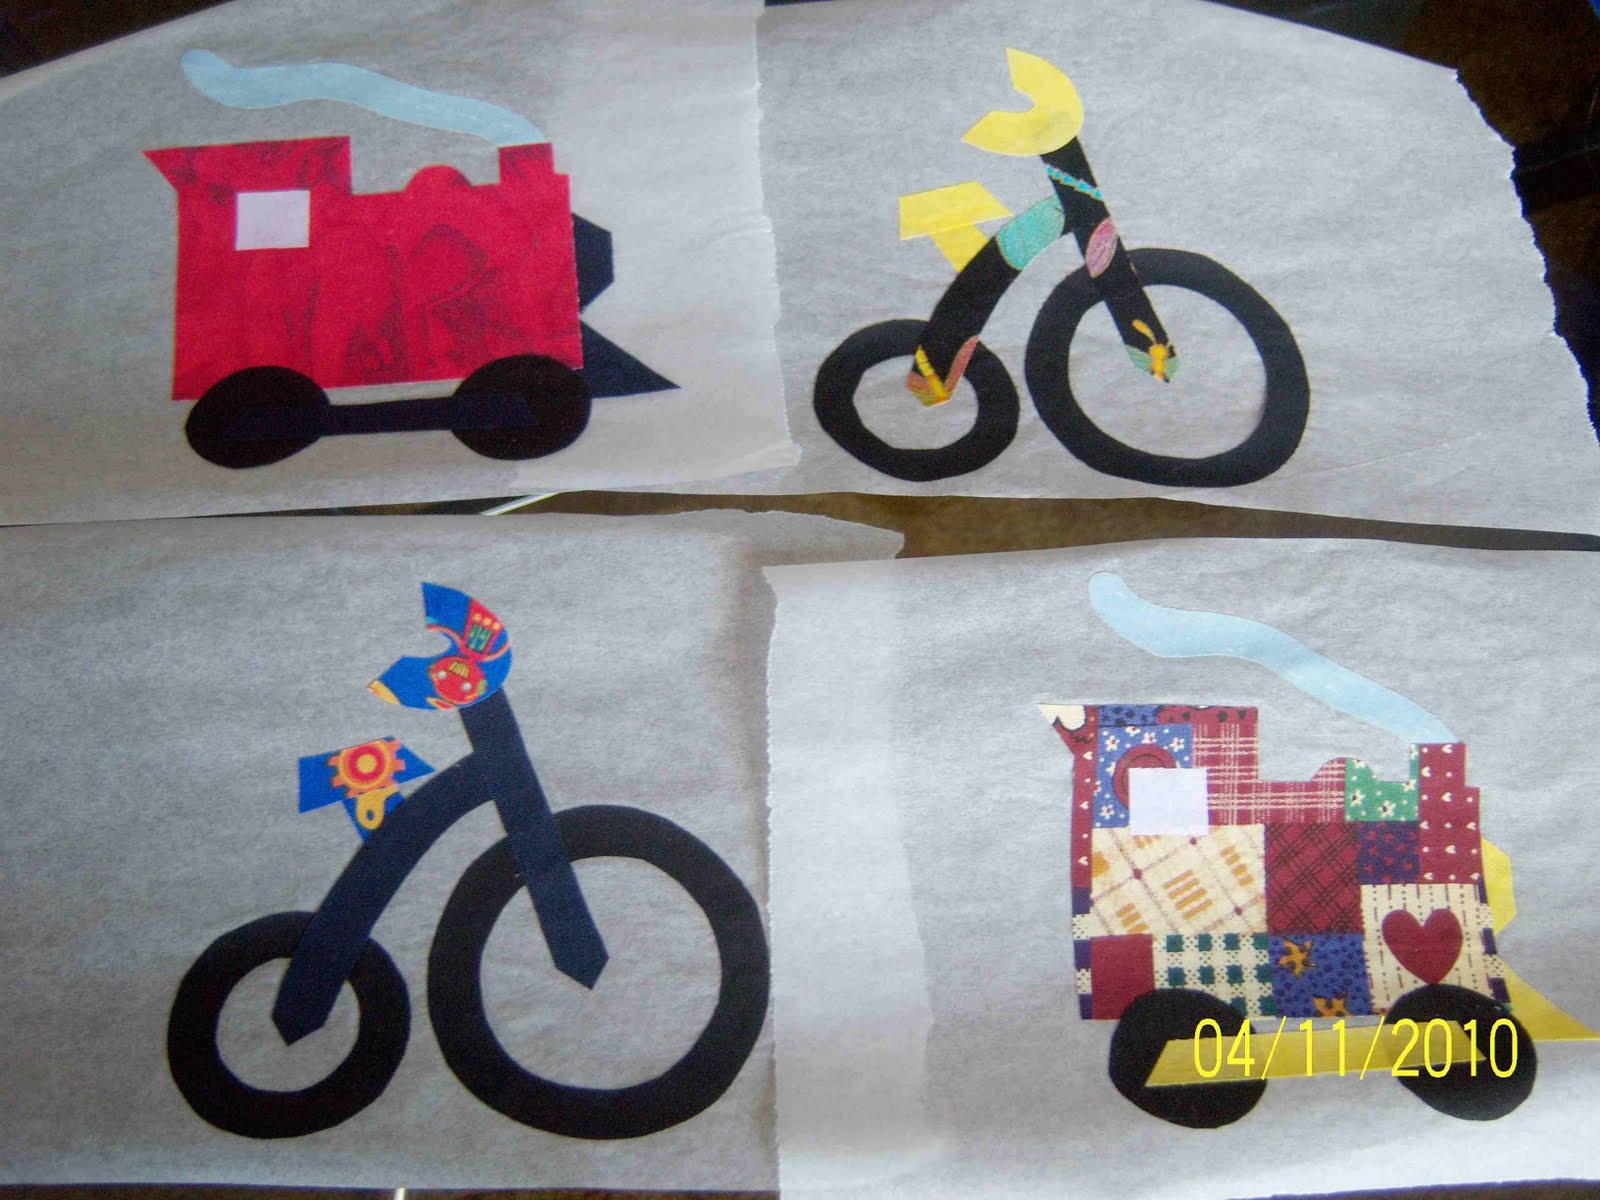
I have put together the applique pictures featuring wheels...what do you think?


Now they have to be placed on calico backgrounds, stitched and then the quilt can get going.
I will decide next week if I will hand or machine stitch the blanket stitch.
With Christmas coming fast, I had best get back to my work...so many gifts to make so little time!!
Hugs for now...

Friday, September 4, 2009

Soooo Civilized

Lots of lace as promised!!
This possum/mouse is the work of one of my Juniors...only the tail to go!!
The other (at school today) has almost finished this angel!
Another senior decided to take the plunge and was impressed by her progress today!

The key ring was completed by a young lass, embarking on a new and exciting time with job prospects on the horizon.

I will be in trouble,for the "rose garden"is upside down, but the end of term marked the end of the length. Now the lass must decide what to do with this piece! Next term, she is going to start this fan!

I will post some of my work next time LOL
Warm regards


Tuesday, May 5, 2009

Do U C what I C?

Greetings Friends,

Here is the beginning of the end :) Yes, it is the final letter of the set! ... Well a start anyhow. The pattern is from Barbara Underwood - Floral Bedfordshire in 20 lessons. The pattern was scaned, then transfered to Publisher and finally elongated to the required size. This method of adapting a pattern would probably be frowned upon by traditionalists, but it has given me the required dimensions. I am using DMC Perle 12 - not a traditional Beds thread, but will compliment the other letters.
I did take a close up, but blogger does not want to talk now :( so watch this space in my next post :)

Now, let me introduce Porty! The school logo is starting to take shape...tomorrow, I will invite a lace student or 2 to make a contribution ... keep watching to find out who Porty is :)

Finally, here is an example of the key rings my Joey Scouts made last night. It is a simple 4 bobbin plait, made on the pillow. 2 of the boys were not that impressed, but the mum and the other 3 Joeys really enjoyed making this little gift to add to a small collection for their mums. We used a 12 ply multi coloured wool for this project.
Thanks for dropping by, hope you found something of interest here. Please feel free to leave a comment ... I am hoping to have the time to drop in on some bloggy friends in the next day or so, but for now I must get some work done so have fun, and be healthy :)
Cheers

Sunday, April 19, 2009

Hairbands, stands and L's

Greetings All,

Yesterday was the April Lace Day meeting for our little group. Unfortunately, I confess to not making 1 twist, crossing or knot :( I did enjoy looking at what other members were up to for a change. Besides, we had a couple of visitors from interstate - DH had some beautiful bobbins and both Ebonee and I helped to lighten the load for the homeward journey - and another visitor from the North West Tassie lace group. As well as helping Ebonee on with her little piece, the chat and friendship was, as usual, full of fun and laughter. Here is the work that Ebonee accomplished.
And up close, you can see the lovely candlelight white glittery thread teamed with a perle 8 verigated pink.
These are her decorated beginner bobbins. The 3 pair on the left are painted, then coated with a clear varnish. The next pair are simply coated with the clear varnish. 2nd from the right have small, torn tissue pieces glued on with the varnish, then a final coat over the top when dry. The right hand pair have the same pink verigated thread as her work wound around the smooth part of the handle, then also finished with a coat of varnish. The pillow, cover cloth, bobbins and spangle beads were part of her birthday present last year.
When she got up this morning, she put in another 6 pins or so. When she is finished, we are going to add a ribbon, a piece of elastic and she will have a pretty hairband to impress her friends with :)Here is the adjustable table DS made for me to make lace on. Well.... actually he made me a cross stitch stand, but when I began making lace, he made a new piece to put in the top so I could put my pillow on. When I want to cross stitch, I can take the table piece out, and put the old cross stitch frame holder back, using the 2 lengths that are folded down here. He even added some stenciled silver roses, coz he knows his mum loves them :) Isn't he a clever lad?!
This is what it looks like with the pillow on top. Everything is adjustable so you can fit it to (almost) any chair/working height and angle. Ok, ok! Yes I have also done a little :) Here is the beginnings of my L.A.C.E. letter L. I am using the leftover Oliver Twist thread from my hankie (isn't it a gorgeous colour) and the pattern is my first ever attempt at design. It is an adaption of a Rosemary Shepherd design from her Introduction to Bobbin Lace book. I needed to widen the insertion, add corners and cut and shut to fit a bubble frame. I added a cross stitch of LOML's 3 children and presented it to their Nanna for her birthday a couple of years ago. This time, I will just make a long and short leg and....bingo - my L!

If you made it this far, thanks for reading :) I really do hope you enjoyed. Don't forget to have your say in the comments section - Ebonee read every single comment earlier - wow there have been lots of new friends made here :)
Have a wonderful day!!

Wednesday, March 11, 2009

L.A.C.E.

Here is a peek at my next project. I have been thinking about this one for a little while as I was asked to do a display in the foyer at school later in the year. I intend to make each of the letters in the word lace in a different kind of lace. My aim is to make a Torchon L, a tape lace A, a Bedfordshire C and here is the beginning of a tatted E. Each letter will fit on an A4 backing card, labeled with the type of lace. I am hoping that once it is surrounded by children's photos, snakes, hearts and other bookmarks it will look stunning. I can then use the letters when I go to demonstrations too :)
Later on I may even make the letters in "handmade" - there are plenty of kinds of lace left to try :)

For more info on ATCs, have a look at my last comment in that post. Thanks for visiting and have a fun day:)

Wednesday, February 25, 2009

Back to the Beds :)

Greetings All,
After spending some time at the sewing machine making our new hovercraft skirt yesterday, I was finally able to get back to the Beds ring :) This was the progress at 11 pm!

Yup! The lace is finished...yippppeeeeeeeeeee! It was time for bed so a very good excuse to allow the lace to rest too :D

There were 26 pairs to join up, and that was completed this morning...an easier task than I envisaged as 2 pair went into each pin hole. So, here 'tis! Slightly smaller than a CD and only about 80 "furry bits" to sew in :)

The bunch on the right are going to be threaded through the leaf. I was not happy with the result after throwing so many back. I was trying not to need them all thrown back at once, but the result is that the threads are bare on the bottom half of the leaf. I will stitch them through with a fine needle, and hopfully that will sort out the problem...lesson learned for next time :) The left hand lot are the finishing off line...will be able to darn through the cloth stitch bits to finish off nicely I think.
This little parcel arrived in the post this morning...my Arachne secret pals gift all the way from the U.K. Am I a lucky Gal or what!! Last month there was a reel of green Oliver Twists thread, and my friends below are eagerly awaiting me to choose a pricking and get started...I am thinking torchon hankie edge to complete the white Batiste here...then I will have a gorgeous gift in my pocket, all from somewhere in the U.K :)
These little "pillow pals" keep me company whilst lace making. The mouse pin cushion and the horse shoe were gifts from my Gumlace secret pal and have become very welcome on this pillow...made themselves right at home in no time at all :) The 5 divider pins on the right are handmade glass pins, made by one of our Tassie lace makers. I think my favorite is still the ladybird, but I love them all.
My quilt blocks are safely in the post and should be winging their way somewhere near Alice Springs by now. I have made a "piece" to be chopped into my first ever ATC's, once they are adorned with a little fancy needle work and some lacey bits. But first...many bobbins to wind...lace starts at school on Friday!
Enjoy :)

Monday, February 2, 2009

Vehicles, students and WIPs

Hi All,


Thanks for your kind comments, Jenny, the baubles were fun to make, if rushed at the last minute...all recipients were thrilled to bits too :)
I cannot share a lot of the lace I have been making at the moment for 1 reason and another, but on Saturday, we got to ride in this restored 1915 Model T Ford on (one of) it's first excursions out of the garage. This has been a 12 month project and came home from Newcastle (Australia) as a trailer load of rust!

And whilst Father laboured over the 1st vehicle, Son (aka DB) has been 6 years labouring over this bag full of fun...and stubbornness...and frustration...and did I mention fun?? Although we played 2 years ago, there has been some major reconstruction work and yesterday was the "new" maiden voyage. Heaps of fun, sand...and repair work! But it was worth it...even if he is threatening to sell it again - over my dead body! :)


OK, OK, what about the lace? The pic on the bottom is the full lace story of a new friend. She came to stay for a week, on a visit to renew old acquaintances (DB being 1 of them). As I have been working flat out on lace, she became interested and after completing the snake (a Christine Springett design) she was eager to go again. From my collection, the bookmark was chosen...and completed! One very happy and enthusiastic new lace maker is born!
My floral beds piece was started in September on a visit from Barbara Underwood...the workshop was challenging and heaps of fun...I learned soooooo much! I took the pillow to school to show my students what I was working on and despite being asked not to touch please, one lass decided to 'rearrange the bobbins and divider pins for me .... Grrrrrr. Tis OK...no harm done and the bobbins are finally untangled and work is progressing...all be it very slowly!
Happy lace making and thanks for visiting :)

Monday, January 26, 2009

Key ring inspiration

Hi Guzzisue, and everyone


Yes we threaded the passives through the small ring attached to the keyring by passing the centre loop up through the ring and then threading the bobbins through the loop. The workers started on the first pin, so that they don't pull oddly. You can work the leaf in any stitches you please...I used a smaller size to decorate my Christmas baubles...then gave them to friends as gifts. I put 4 leaves on each ring and worked opposing leaves the same...1 set in half stitch and the other in cloth, cloth and twist. You could also use 3 leaves all the same or all different...so many possibilities :) Once the leaves are complete, bundle the whole lot together under the bauble, wrap a few times with a pair of workers and tie off. Just measure the circumference on your bauble, divide in half then make a leaf shape to suit! Enlage to a suitable size on the photocopier to make the keyring.

A word of warning though...for the Christmas baubles, make sure your metal ring fits snugly under the hanging attachment so that you can replace the hanger to complete your bauble. Also, be very careful of the join in the ring...it will snag the thread very easily or slip off the loops if you do not take care.

Saturday, January 24, 2009

1st Lace Day of the year

I would like to send a warm welcome to all the visitors to this blog...I hope you are finding something of interest here.


A Lace Day with some work done!! Yes it does happen occasionally. 10 year old Ebonee started and completed her project number 4... a keyring leaf made in perle 8 cotton thread using cloth and twist and cloth stitches. She completed this project with very little input from me at her first visit to my lace meetings. She is eager to go back again and almost ready to start on her next project...a half stitch flower that one of our juniors was making today.

And I also made some progress! I was very keen to have a go at needle lace before Christmas and participated in a workshop held by a couple of our members. At the next meeting, I proudly showed my flower, only to be told it was not complete :( Not to be put off in any way, I tried again...with full instructions on how to finish off my flower. I have made several attempts, but have not been happy with the result of the final cover stitches. I have to admit that I was almost ready to give up and stick to bobbin lace and tatting. I know there is much practice required, but these are the first time:) I think I might try a butterfly next! And finer thread. And some bobbin lace too. Here is the final lead up lesson for my school students. This bookmark features spiders, trails and ground. Now all I have to do is the lesson notes! One of the juniors in our lace group wishes to have a go at the fan when the notes are complete. She will soon let me know if she thinks something is not right.